Want to bring the fun of Japanese Yakitori grilling to your home with your own DIY Yakitori Grill project? Here’s everything you need to know to get your project off the ground.

Yakitori grilling makes for the perfect finger food or appetizer.
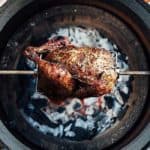
The word Yakitori is literally translated as ‘grilled chicken’, but that name does a disservice to the variety that the grill method offers.
Traditional Yakitori grills are essentially a rectangular box made from clay, and are only a couple of feet long and just a few inches wide.
This small size allows users to cook small skewers, each only taking a few minutes to grill.
Not too dissimilar to hibachi, but the key difference is that the skewers allow the meat to sit above the heat and not directly on it or on grill grates.

But you want to make your own on a kitchen or dining room counter, for social occasions so everyone can have a good time grilling their own food.
I’ve really enjoyed my own DIY grill and smoker projects in the past, but a lot of these can be unrealistic for people who don’t have a lot of land or balcony space to utilize.
So today I wanted to put together something that can be used on small patios and balconies, or even inside.
This DIY Yakitori grills are small and functional and – best of all – fun to use!
What is Yakitori grilling?
Yakitori grilling is similar to Korean barbecue in the sense that it has a communal spirit, and a cook-while-you-eat appeal.
What really sets it apart from Korean BBQ however is that it is mostly done with the use of skewers.
This isn’t as limiting as it might sound though, as a whole range of meats and vegetables can be made in creative ways Yakitori-style. Keep reading for some of my favorite Yakitori grilling recipes!
How to make your own Yakitori grill
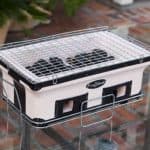
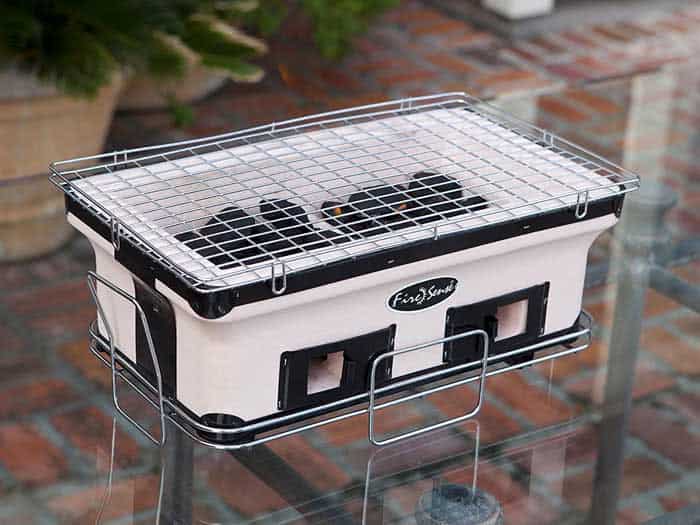
Store bought Yakitori grills are fairly inexpensive (like this) but what’s the fun in that?
Furthermore, genuine and authentic Yakitori grill models can also cost closer to the region of $300-400.
So to get your own version that doesn’t break the bank, let’s take matters into our own hands and get our hands dirty. We’ve successfully made our own pellet smokers and DIY offset cookers, and homemade Yakitori grills are actually a lot easier to put together.
I’m going to lay out two styles here. One is going to be a ‘clean’ style that is portable and can be used indoors as well as outdoors.
The other I’m going to explain is a fixed version that is brick built.
Let’s get into it!
How to make a wood panel Yakitori grill
To start things off, we’re going to form the main part of our grill with a hotel pan. If any of you have worked in catering or in kitchens then you should recognize these.
Kitchen pans are used for holding and storing food, and even occasionally for cooking. What makes them perfect for our DIY Yakitori project is that they’re made of steel and are sturdy.
Ideally you want something that’s rectangular in shape, and about 4-6 inches deep, like this.
Place the pan on a brick paver.
Cut a 8ft pine board down to create a surround for the four edges of the hotel pan.
Use aluminum foil tape and fiberglass insulation to line the inside of your wood surround. This will help protect the wood from the heat and possible fire exposure.
Finish it off with some brass decorative corner fittings.
How to make an outdoor brick Yakitori grill
For this you’ll need a few basic materials, some of which you might already have lying around:
- Wood boards or planks
- Stone or Brick Pavers (1.5 inch by 15 inch)
- Brick
Create a platform from your wood. Ideal height is about 12 inches. Nothing too high.
Lay pavers on top of the platform. You should only need a couple, laid end-to-end. Position them in the center, so that there is still some space around the perimeter for the bricks.
Lay bricks, edge down, around the perimeter of the pavers. Place two bricks at either end, and then another line of bricks on the inside.
Ensure that the width of your grill can hold skewers across it.
How to use your brick Yakitori grill
Fire up some coals in a charcoal chimney (about two-thirds full should be enough). Once ready, slowly pour the coals into the base of the grill. Be sure to cover the base of the grill before starting to pile them on top of one another. Check out our guide on how to use a charcoal chimney to find out more.
Allow your coals to cool to embers before putting your skewers on the grill.
One quick tip here. Resting your skewers directly on the brick might run the risk of them burning, and maybe even breaking, so try lining the top of the brick with aluminum foil. This should help protect them enough to keep them in place.
Another quick tip is to pile up the coals slightly more at one of your grill. This will allow you to crank up the heat to finish off your food with a quick sear when it’s nearly ready. This will help you develop that beautiful charred look to your food when serving up.
Try adding a touch of smoking wood to add a little more flavor to your meat. Just a touch of hickory should add a touch more smokey flavor.